Registration
Four details that get your Binance verification rejected
The official flow is seven steps, but rejections cluster around two of them: the document photos and the final confirmation screen. Four details decide whether you pass on the first try.
Verification is where most first accounts stall. The flow itself is short — Binance documents seven steps for a personal account on the web — but rejections cluster around two of them: uploading the document, and confirming your details at the end.
Four things decide whether you pass first time. The document has to be an original rather than a copy or a screenshot. Both sides of an ID card have to upload before you can continue. The face check bars hats, glasses and filters, and wants decent light. And the personal details you confirm at the end cannot be changed afterwards. Each one below is matched against what the official page actually says.
Where the verification screen lives
It is not on the homepage. From a logged-in account you go through [Account] → [Identification], then [Verify Now]. The banner prompt on the homepage leads to the same place.
That page also shows your current verification level, which is what determines your account limits. Check which level you are on before assuming you need to do anything at all.
The seven steps, in the order the guide gives them
Enter the verification page; choose your residence, the country or region that issued your document, and the document type; upload the document from the current device or scan the QR code to continue on a phone; upload both sides of the ID card; complete the liveness check; confirm your personal information; wait for the review.
One early note worth reading twice: "Manual upload option availability depends on the country." In some places the desktop upload simply is not offered and you have to finish on a phone.
Detail 1 — an original document, not a copy or a screenshot
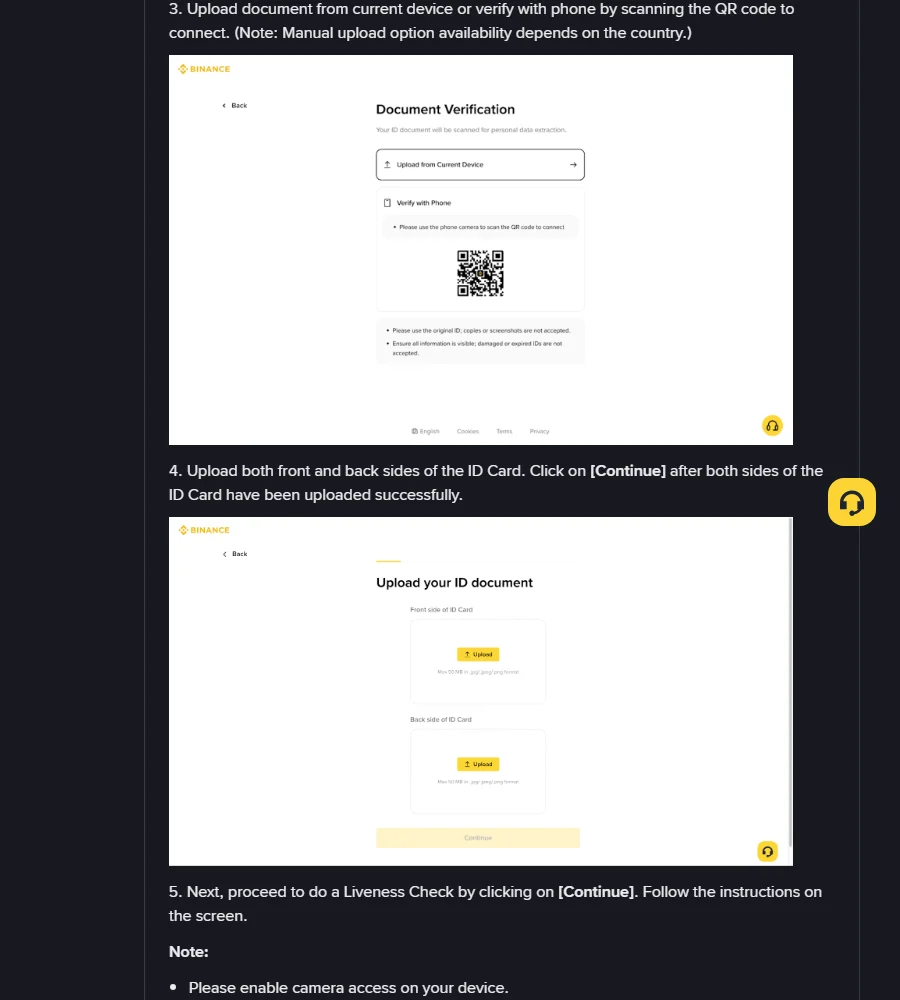
The upload screen states it plainly: "Please use the original ID, copies or screenshots are not accepted," and "Ensure all information is visible; damaged or expired IDs are not accepted."
So photograph the physical document. A picture of a photocopy, a scan, or a screenshot of a document you already have saved on your phone will come back rejected. Damaged cards and anything past its expiry date are out as well.
The upload boxes also state their own limit: max 50 MB per file, in .jpg, .jpeg or .png. Nothing else goes through.
Detail 2 — both sides of the ID card have to upload
Step four reads: "Upload both front and back sides of the ID Card. Click on [Continue] after both sides of the ID Card have been uploaded successfully."
There are two separate boxes, one for each side. The usual confusion is people uploading the front, seeing nothing happen, and assuming the page is broken — the Continue button simply stays inactive until the second upload finishes.
Detail 3 — no hat, no glasses, no filter, and enough light
The liveness check comes next, and the guide is specific: "Do not wear hats, glasses, or use filters, and make sure that the lighting is sufficient." It also reminds you to enable camera access on the device first.
The on-screen prompts add more: show your face clearly, keep your whole face centred with your eyes open, maximise screen brightness, and stay in a well-lit area. One line is easy to miss — your face and background will be recorded — so do this somewhere you would not mind being on camera.
Detail 4 — what you confirm at the end is final
The confirmation screen carries the hardest constraint: "Please make sure that all the information entered is consistent with your ID documents. You won't be able to change it once confirmed."
The fields are nationality, legal name split into first, middle and last, date of birth, residential address, postcode and city. Given and family names entered the wrong way round, a date written in your local order rather than the one the form expects, an address that does not match the document — each of those is a rejection, and none of them can be edited afterwards. Read the form against the document once more before you continue.
After you submit: don't refresh, and don't panic on day two
Step seven says "Binance will review your data in a timely manner. Once your application has been verified, we will send you a notification," with an explicit instruction not to refresh the browser while it processes.
On timing, the FAQ on that page says submitted documents "are usually reviewed within 48 hours," while noting that "it may take longer in some particular cases." So silence on the second day is not by itself a sign that something went wrong. If it does come back rejected, the notice names a reason — fix that specific thing rather than re-uploading the same photo.
Sources, and when they were checked
The seven steps, the document types, the original-document and both-sides requirements, the liveness conditions, the final-confirmation warning and the review time all come from How to Complete Identity Verification for a Personal Account?, updated 2026-06-04. The page was opened and read on 19 September 2026, and the screenshot above is from that session.
Verification screens get redesigned, so treat the prompts in front of you as the current version. The registration step before this one is covered in Binance sign-up: the four entry points, and the whole path in What actually happens between signing up and owning your first crypto.